


 It was September last year when I first heard about Open Device Lab at the TestHuddle Eurostar webinar. It sounded like a really great idea because as a tester I spent hours charging devices, setting up networks, taking screenshots etc. Why not have all the devices stored in one place, always charged and with known operating systems and settings?
If you are interested in device testing, I have previously written a blog post entitled Mobile Testing : Why test and how to decide what to test?
After suggesting at an offsite team meeting that I would like to build a device lab and getting a a ‘yes, that’s fine, go and do it’ response, this became a small project for me in my spare time.
There are many different suggestions on the internet as to how to setup a device lab, for example Smashing magazine and Codescraft, but starting from scratch is always a hard option. We decided on a few key requirements for our lab:
- Make it mobile so it can easily be moved to someone’s desk
- Make it so all devices can be charged by plugging in just one extension cord
- Research software that will improve testing on multiple devices
Firstly, we needed to decide on where we were going to put the devices. Looking at other device labs, they were normally held in racks or in one stationary place for easy access. Professional racks are small and not cheap (see an example from GhostLab) so that left us with either building our own rack or buying something similar.
Whilst we have lots of people in the company with DIY skills, we decided that building one from scratch would take too much time, planning and work. So instead we looked at similar racks like bread racks, snack racks and finally ended up purchasing a shop greetings card display rack from eBay.
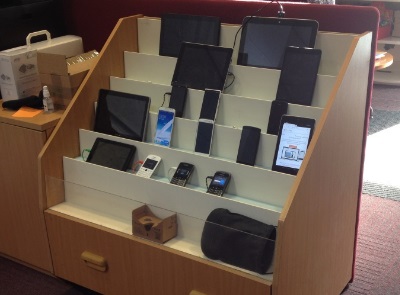
##Physical work When the display rack first arrived everybody said it looked way too big and would take up too much space. However, after putting all the devices we had on it, it suddenly didn’t feel so big anymore.

The devices, especially the smaller ones, sat too low in the rack to be usable so we bought some foam cut to size to lift the devices up above the edges of the rack. However, the biggest challenge was drilling the large holes for cables to come through (those old iOS and laptop cables are big!). Each hole took about 5 minutes to drill slowly (we had to do it slowly or the friction created would have set the wood on fire) and the smell was horrible! Jokes aside, you wouldn’t do it on days when clients were visiting and even without client days, it was a very slow process!

We bought at least 15 micro USB cables and 3 lightning cables as we had lost or broken the ones that had came with the devices. To avoid a wiring nightmare we bought 3 USB chargers with 5 sockets each and one had an extension lead. They were neatly tied with velcro and cable ties and screwed into their final locations.


Finally, to hide it all we glued metal sliders on to a wooden back with handles in case we ever needed to get to the cables.
##Setup Having lots of devices connected to your WiFi router can sometimes cause issues, and with everyone in the office already connecting to loads of devices we decided to buy a separate router just for the Device Lab.
I did a lot of research into various multi-browser testing tools that would mean we no longer needed to manually open every page on each device being tested and then click on a link. Being able to change a page on one device and have it do the same on all connected devices would save an immense amount of time. Despite various problems I had with mobiles not connecting to the internet and not being charged, here are the results of tools I have tested so far:
- Adobe Shadow or Adobe Edge Inspect - this is a great tool, but for some reason it couldn't be downloaded from Google Play on some of the devices and when downloaded it wouldn't connect to my computer
- BrowSync - whilst it was easy to download and try out, it wouldn't load pages correctly, e.g. it wouldn't scroll pages in iOS and would be missing elements on Android devices. (This is when you actually launch a link from the website instead of just buying the app. It might have been better if you purchased the app, but then would you do that for each device?)
- Muir - I downloaded the desktop version only as the mobile version is not free of charge I didn't like teh idea of paying $3 for an iOS app, $3 for an Android app and then another $3 for a Kindle one etc.
- Browser-Sync - has similar functionality to the others and is open source. As is sometimes the case with open source software I found this solution quite buggy so didn't explore too far.
Finally, we decided to set up our Device Lab using GhostLab. As well as having a pretty cute WALL-E type logo it is working quite nicely. Here are some good points:
- It doesn't need to be installed on each device. Just open a computer’s IP/port and it loads the page
- As you scroll on a computer, it scrolls on all devices. The same happens if you scroll on any of the devices
- It costs $49 (not that expensive as it's a one-off payment). In fact, we paid more for the device rack!

Top tip - disable the devices automatic sleep mode otherwise you are constantly having to turn on every device!
##Maintenance Device Lab is great once setup, but it does require maintenance. We still need to put stickers on for devices locations, create a page with all devices available and link that to the Open Device Lab page before then making it publicly available.
We also encountered some maintenance problems during the process of setting up the Device Lab. Our Nokia Lumia stopped working, our HTC One couldn’t find any WiFi and some devices weren’t great at recognising GhostLab. Our handles on the device rack broke so had to be screwed in again and we have bought extra screen cleaner kits to make sure devices don’t get dirty and can be used ok. Overall it’s looking ship shape now and is ready for use.
##Try it out for yourself! Based in Letchworth, our DeviceLab is open to anyone in the Hertfordshire / Bedfordshire area (or further afield if you wish to travel) who has a website or app to test. Best of all it’s free (although if you use our devices for a particularly long time then a small donation towards the upkeep of the lab or a round of tea would be welcome)!
If you would like to arrange a visit, or just want to know more about which devices we have available in the Lab then send us an email and we’ll get back to you.


